Machine Learning Model Deployment with Amazon SageMaker
Introduction:
Machine Learning has emerged as one of the most trending topics in the current era, and leading cloud provider Amazon Web Services (AWS) offers a plethora of tools to delve into this field, enabling the creation of highly accurate models. This article aims to acquaint you with one such service on AWS:
Here is the graph diagram illustrating the relationship between Amazon SageMaker, other AWS services, and the ML lifecycle:

Amazon SageMaker:
SageMaker facilitates the creation of efficient and more accurate machine learning models. Additionally, it provides the advantage of seamlessly integrating with other AWS services, such as S3 buckets and Amazon Lambda. Furthermore, for monitoring the performance of your ML model, you can leverage AWS CloudWatch, a powerful monitoring tool offered by AWS.

Amazon SageMaker offers a fully-managed service, empowering data scientists and developers to swiftly and effortlessly construct, train, and deploy machine learning models of any scale. With Amazon SageMaker, users gain access to modular components that can be utilized collectively or independently to facilitate the creation, training, and deployment of their machine learning models.
Here is the mindmap diagram illustrating the features, components, and benefits of Amazon SageMaker:

For many AI enthusiasts, the journey doesn’t end after achieving stellar model accuracy. The daunting task of deployment often looms large. But fear not! Cloud services like Amazon SageMaker have revolutionized the way we build, train, and deploy ML models at scale. This comprehensive guide will delve into the end-to-end deployment process using SageMaker, focusing on the powerful XGBoost algorithm as an example.
Understanding the Machine Learning Lifecycle:
The lifecycle of an ML project is a multi-stage odyssey. It begins with Exploratory Data Analysis (EDA) where we understand and prepare our data. This is followed by choosing the right algorithms and allocating computational resources for training. However, the deployment phase, where the model goes live in production, is arguably the most critical.
Here is the flowchart diagram illustrating the stages of the ML lifecycle:

Simplifying Deployment with Amazon SageMaker:
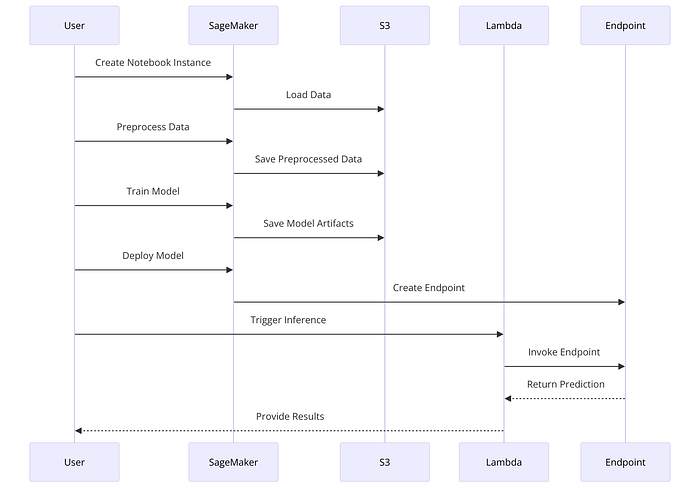
Amazon SageMaker swoops in and streamlines the complexities of the entire ML lifecycle, making deployment a breeze. Gone are the days of wrestling with infrastructure setup. SageMaker empowers developers to effortlessly choose algorithms and frameworks, while seamlessly handling training and deployment.
Here is the sequence diagram illustrating the process of deploying a model using SageMaker:
Case Study: Deploying a Finance Prediction Model with SageMaker
Let’s embark on a practical adventure! Imagine a developer working in a bank, tasked with deploying a model to predict customer enrollment for certificates of deposit (CDs). The project leverages an open-source dataset from the University of California, Irvine, containing customer demographics, external factors, and marketing responses. Our objective is to build and deploy a supervised ML model using SageMaker.
Here is the flowchart diagram illustrating the detailed steps involved in deploying a finance prediction model using SageMaker:

Steps to Deploy Your Model with Amazon SageMaker:
- Notebook Instance Creation:
Our journey begins with creating a SageMaker notebook instance. This serves as our development environment, enabling us to write and execute code, perform data analysis, and train our model.
- Instance Types: SageMaker offers a variety of instance types suited for different workloads. Consider factors like memory, processing power, and cost when choosing an instance type. For instance,
ml.t2.mediumis a good starting point for small to medium-sized notebooks, whileml.m5.xlargeprovides more power for complex tasks. - Lifecycle Scripts: You can leverage SageMaker lifecycle scripts to automate tasks like model packaging, environment setup, and model deployment during notebook instance creation. This enhances consistency and reduces manual configuration.
- Security Groups: Configure security groups to control inbound and outbound network traffic for your notebook instance. This ensures only authorized applications can access your resources.
# Define the instance type and role
instance_type = 'ml.t2.medium'
role = sagemaker.get_execution_role()
# Create a notebook instance
notebook_instance = session.create_notebook_instance(
    notebook_instance_name='my-notebook-instance',
    instance_type=instance_type,
    role=role
)- Data Preprocessing:
Before we train our model, data quality is paramount. This step involves cleaning and preprocessing the dataset. We’ll handle missing values, encode categorical variables, and scale numerical features.
- Missing Value Imputation: There are various techniques for handling missing values, such as mean/median imputation or more sophisticated methods like KNN imputation. Choose the approach that aligns with your data and modeling goals.
- Categorical Encoding: Techniques like one-hot encoding or label encoding can be used to convert categorical variables into numerical representations suitable for training ML models.
- Feature Scaling: Scaling features to a common range can improve the performance of some machine learning algorithms, especially those sensitive to feature scales. StandardScaler is a common choice, but other scaling methods like MinMaxScaler might be applicable depending on your data.
from sklearn.preprocessing import StandardScaler  # Preprocess the data
scaler = StandardScaler()
X_train_scaled = scaler.fit_transform(X_train)
X_test_scaled = scaler.transform(X_test)- Model Training:
Here’s where the magic happens! We leverage SageMaker’s scalable infrastructure to train our XGBoost model on the preprocessed data. SageMaker offers a vast library of built-in algorithms, but also allows you to bring your own, ensuring flexibility for your project.
- Hyperparameter Tuning: Hyperparameters significantly impact model performance. SageMaker offers built-in hyperparameter tuning with tools like Amazon SageMaker Autopilot or Hyperparameter Tuning. These tools automate the process of searching for optimal hyperparameter values, saving you time and effort.
- Early Stopping: Implement early stopping to prevent overfitting. This technique halts training if the model’s performance on a validation set doesn’t improve after a certain number of epochs, preventing the model from memorizing training data.
- Monitoring Training Jobs: SageMaker provides monitoring capabilities to track training job metrics like loss and accuracy. This allows you to visualize training progress and identify potential issues.
from sagemaker import XGBoost  # Define the XGBoost estimator
xgb_estimator = XGBoost(
    entry_point='train.py',
    role=role,
    instance_count=1,
    instance_type='ml.m4.xlarge',
    framework_version='1.2-1',
    py_version='py3',
    output_path='s3://my-bucket/output'
)- Deployment of the Application:
Now, let’s unleash the power of our trained model! SageMaker’s deployment capabilities come into play. We can deploy the model as a managed endpoint, enabling real-time predictions.
- Model Explainability: Consider incorporating model explainability techniques like SHAP (SHapley Additive exPlanations)) to understand how your model makes predictions. This can be crucial for gaining trust in the model’s decisions, especially in financial applications.
- Real-time vs. Batch Predictions: Depending on your use case, you might choose real-time or batch predictions. SageMaker supports both deployment modes. Real-time predictions are ideal for low-latency applications, while batch predictions are suitable for processing large datasets periodically.
- Automatic Scaling: Leverage SageMaker’s automatic scaling capabilities to ensure your endpoint can handle varying loads. This dynamically allocates resources based on traffic, optimizing costs, and ensuring model availability.
# Deploy the model predictor
predictor = xgb_estimator.deploy(
    initial_instance_count=1,
    instance_type='ml.m4.xlarge'
)
# Invoke the endpoint to get a prediction
result = predictor.predict(test_data)
Performance Evaluation: Ensuring Your Model Thrives in the Real World
The deployment phase isn’t the finish line! Just like any well-oiled machine, we need to monitor our deployed model’s performance to ensure it continues to deliver accurate predictions in the real world. This involves continuously evaluating the model using key metrics. Let’s delve into some crucial metrics and how we can use them, with an example:
Metrics Breakdown:
- Accuracy: This is a general measure of how often the model makes correct predictions. It’s calculated as the number of correct predictions divided by the total number of predictions.
Example: Imagine our deployed model predicts CD enrollment for a bank. An accuracy of 80% would signify that for every 100 customer interactions, the model correctly predicts CD enrollment 80 times. While high accuracy is desirable, it’s not always the most informative metric, especially for imbalanced datasets.
- Precision: This metric focuses on positive predictions. It tells us what proportion of the model’s positive predictions are actually correct. It’s calculated as the number of true positives divided by the total number of positive predictions (including false positives).
Example: Continuing with the CD enrollment prediction model, let’s say the model predicts 100 customers will enroll in CDs. Precision tells us how many of these 100 predicted enrollments are truly going to happen. A high precision indicates the model is accurate in identifying potential CD enrollees.
- Recall: This metric focuses on completeness. It tells us what proportion of actual positive cases (e.g., customers who will enroll in CDs) are correctly identified by the model. It’s calculated as the number of true positives divided by the total number of actual positive cases (including false negatives).
Example: In our scenario, recall indicates how well the model captures all the customers who actually intend to enroll in CDs. A high recall ensures the model doesn’t miss out on potential CD sales.
- F1 Score: This metric provides a balance between precision and recall, offering a more comprehensive view of model performance. It’s calculated as the harmonic mean of precision and recall.
Example: The F1 score considers both precision and recall, giving us a clearer picture of how well the model identifies true CD enrollees while avoiding false positives.
Beyond the Basics:
While these core metrics provide a solid foundation, consider additional factors depending on your specific use case:
- Cost Sensitivity: If misclassifications have varying costs, you might prioritize metrics like cost-sensitive accuracy or cost-benefit analysis.
- Class Imbalance: In cases where positive and negative cases are not evenly distributed, metrics like AUC-ROC (Area Under the Receiver Operating Characteristic Curve) can be more informative than accurate.
Continuous Monitoring:
Remember, performance evaluation is an ongoing process. Regularly monitor these metrics and set up alerts to notify you of any significant changes. This allows you to identify potential issues like data drift (where the real-world data distribution deviates from the training data) and take corrective actions such as retraining the model.
By adopting a data-driven approach to performance evaluation, you can ensure your deployed model with Amazon SageMaker remains effective and delivers valuable insights over time.
Key Takeaways: Deploying a Finance Prediction Model with SageMaker
This blog unpacks the exciting world of deploying machine learning models, specifically focusing on a finance prediction scenario using Amazon SageMaker. Here are the key takeaways you can take action:
- Simplified Deployment: SageMaker streamlines the entire ML lifecycle, from creating notebook instances for development to deploying models as managed endpoints. This eliminates tedious infrastructure management tasks, allowing you to focus on building and training your models.
- Structured Approach:
The blog outlines a step-by-step process for deploying your finance prediction model, encompassing:
Creating a SageMaker notebook instance for development.
Preprocessing your financial data to ensure quality.
Training your XGBoost model using SageMaker’s scalable infrastructure.
Deploying the trained model as a SageMaker endpoint for real-time predictions.
Evaluating the model’s performance using metrics like accuracy, precision, recall, and F1 score.
- Actionable Insights: You gained valuable insights on how to handle common data preprocessing tasks like missing value imputation, categorical encoding, and feature scaling, making your finance prediction model ready for training.
- Real-World Considerations: The blog emphasized the importance of performance evaluation beyond deployment. By continuously monitoring metrics and implementing techniques like A/B testing and drift detection, you can ensure your model stays effective in the ever-changing financial landscape.
- Power of SageMaker: You’ve witnessed how SageMaker empowers you to build, train, and deploy sophisticated machine learning models for financial applications. This opens doors to a world of possibilities, from predicting customer behavior to optimizing risk management strategies.
By leveraging these takeaways and the power of SageMaker, you can take your financial predictions to the next level, gaining a competitive edge and making data-driven decisions that drive business growth.
Conclusion: Unleashing the Power of ML with SageMaker
The journey from building a machine learning model to deploying it in production can be daunting. However, with Amazon SageMaker, this process becomes streamlined and efficient. This comprehensive guide has equipped you with the knowledge to leverage SageMaker’s capabilities, from creating notebook instances and data preprocessing to model training, deployment, and performance evaluation.
By embracing SageMaker, you can unlock the true potential of your ML models, transforming them from theoretical constructs into real-world solutions that drive business value across various domains. Whether you’re in finance, healthcare, or e-commerce, SageMaker empowers you to harness the power of machine learning and make data-driven decisions with confidence.
Take the next step!
Explore the vast resources offered by Amazon SageMaker to delve deeper and embark on your own successful ML deployment journey.
References:
- Amazon SageMaker Documentation: https://docs.aws.amazon.com/sagemaker/
- A Beginner’s Guide to Model Explainability: https://machinelearningmastery.com/
- Hyperparameter Tuning with Amazon SageMaker: https://docs.aws.amazon.com/sagemaker/latest/dg/automatic-model-tuning-how-it-works.html
- Amazon SageMaker Data Wrangler: https://aws.amazon.com/sagemaker/data-wrangler/